• Sql Server Bulk Insert

    Passing a CSV file (separate files through a delimiter, such as a tab) to an SQL table is a frequently required process. There are several ways, importing and exporting the data to the travel assistant of a tool Built-in SQL Server.

  • Import CSV File Into Sql

    It is always necessary to pass the records of a flat file to an SQL server table, since they are needed processed within the database.

✅ Example: Import CSV File Into SQL Server Using Bulk Insert (Code)

Passing a CSV file (separate files through a delimiter, such as a tab) to an SQL table is a frequently required process. There are several ways, importing and exporting the data to the travel assistant of a tool Built-in SQL Server.

Sql Server Bulk Insert Example

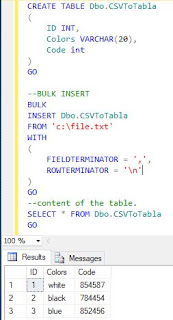
Another way to solve it is through a bulk insert, here is a way simple to do:

1. First we create a CSV file, demolished by commas:

1,white,854587
2,black,784454
3,blue,852456

And we save the file: C:\file.txt

Post Popular

2. Then we create the table where the data will be stored:

CREATE TABLE Dbo.CSVToTabla
(
ID INT,
Colors VARCHAR(20),
Code int
) GO

3. Now we execute the bulk insert, passing the path where the CSV file is located and the delimiter is parameterized, for this case the comma:

--BULK INSERT
BULK
INSERT Dbo.CSVToTabla
FROM 'c:\file.txt'
WITH
(
FIELDTERMINATOR = ',',
ROWTERMINATOR = '\n'
)
GO

4. Finally we consult the data:
Sql Server Bulk Insert Example


Share:

Easy: Import CSV File Into Sql Server

It is always necessary to pass the records of a flat file to an SQL server table, since they are needed processed within the database.

To solve the above we can do it in different ways. Sql Server provides us with a tool to solve it.

Sql Server Import and Export Wizard Download

Through the Import and Export Data tool we can bring the records that have a defined structure in a flat file and pass them to an Sql table.

To open the tool we go to the Sql Managament Studio and on the database right click select Task -> Import data ... As the following image shows:

Dtswizard

Or we can also execute the dtswizard command:


CSV To SQL

When executing the command or opening the option for the Sql Managament Studio, the following image is shown:

Import and Export Wizard Sql server

Post Popular


Then we select in Data Source: Flat File Source


Select the file (Browse ...) that we need:


To visualize the columns we select Row delimiter and the Column delimiter:


If we need to change the type of data or the size of the column we enter Advanced:


Then we click on Next, select the server where the data destination will be:


In the previous image we click on Next and we see the destination of the table that we are going to load, here we need it we can change the name:


Finally at this point we click on Next, if an incompatibility option appears
In the column data types, we select ignore and end.


We can check the database where the data was in the table we created and validate that everything is fine. This was an example of how to import csv files to sql.
Share:

⭐Sql Server Create Linked Server

Sometimes it is necessary to access another database which is in another instance. To solve it we can create a linked server by linking Server A to Server B.

Create Linked Server

Then we will create a linked server using SSMS (SQL Server Management Studio), following the Next steps:

1. We enter Server Objects --> Linked Servers --> and we right click on New Linked Server as shown in the following image:

New create Linked Server
2. Then it shows us a window to configure the new linked server, see below:

Linked Server Configuration

  • In Linked server we type a descriptive name
  • In server type, we select Other data source, the option Sql Server forces to type the exact name of the server Sql server.
  • We select as provider: Microsoft OLE DB Provider for SQL Server
  • In Data source we digitize the name of the server and the instance
  • Provider string we leave it blank

Configure Linked Server Security

The security of the linked server can be done by these options:

How to create a linked server

  • Be made using the login’s current security context
  • Be made using this security context
  • Local server login to remote server login mappings
  • Not be made
  • Be made without using a securi ty context
For this example we select: Be made using this security context

Post Popular


Then we digitize the user created on the other server with the need to link and digitize their password and click on OK.

With these simple steps the Link server has been created.
Share:

Popular Posts

Categories

Recent Posts